| Project Name | 11gR2/2011 |
| Author | Francisco Munoz Alvarez |
| Software Used | Oracle Enterprise Linux 5.6 Oracle VirtualBox 4.0.2 Oracle 11.2.0.2 Database and Infrastructure Software |
| Date | 02/02/2011 |
The idea of this tutorial is to show you how you can create an Oracle Database 11gR2 using Oracle VirtualBox and OEL.
This installation should never be used for Production or Development purposes. This installation was created for educational purpose only, and is extremely helpful to learn and understand how Oracle works if you do not have access to a traditional hardware resource.
Now let’s start this third part of the tutorial (if do you want to see the first part, please click here: http://bit.ly/hmEVv5 , or go to the second part here: http://bit.ly/gkpHn6 ).
*** Remember to always read the official Oracle Documentation before do a new installation of this product, you can find the documentation here: http://bit.ly/h7UHdV .
For the installation of the Oracle Database 11gR2, we’ll need to go thru three basic steps:
- Oracle Database Preinstallation Requirements
- Oracle Grid Infrastructure installation
- Oracle Database installation
This looks a little bit more complicated that a normal installation on previous releases (prior 11gR2), but don’t be worry you will see that is not complicated at all!
Let’s start taking a look in the first step.
1) Oracle Database Preinstallation Requirements
These are tasks you must complete before install any Oracle products in your server.
- First we need to open a terminal screen as “root”.
- Now that we are connected, we will need to:
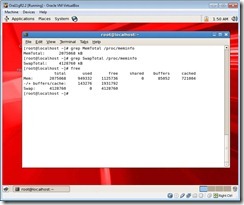
- Check if we have at least 1GB of memory available, we can check it using the command :
# grep MemTotal /proc/meminfo
# grep SwapTotal /proc/meminfo
another command you can use to check the full memory configuration is the command: free
- Now at 11g the Automatic Memory Management feature requires more shared memory (/dev/shm) and file descriptors. The size of the shared memory should be at least greater of Memory_Max_Target and Memory_Target of each Oracle instance in the server.
*** If
MEMORY_MAX_TARGETorMEMORY_TARGETis set to a non zero value, and an incorrect size is assigned to the shared memory, it will result in anORA-00845error at startup. On Linux systems, if the operating system/dev/shmmount size is too small for the Oracle system global area (SGA) and program global area (PGA), even then it will result in anORA-00845error.The number of file descriptors for each Oracle instance should be at least
512*PROCESSES. Also, the limit of descriptors for each process should be at least 512. If file descriptors are not sized correctly, you will noticeORA-27123from various Oracle processes and potentiallyLinux Error EMFILE (Too many open files)errors in non-Oracle processes.
MEMORY_MAX_TARGETandMEMORY_TARGETcannot be used whenLOCK_SGAis enabled or with HugePages on Linux.(From Oracle manual ***)
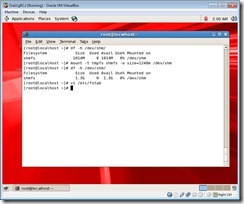
- To check your current amount of shared memory available , enter the following command:
# df -h /dev/shm/
In this case we have 1024M of shared memory available, let’s change it to 1240M, for this, just run the following commands:
# mount –t tmpfs shmfs –o size=1240m /dev/shm
To make this change persistent thru restarts of the system, please add the following line to your /etc/fstab
shmfs /dev/shm tmpfs size=1240m 0
- The Following packages or later versions of them must be installed:
- binutils-2.17.50.0.6
- compat-libstdc++-33-3.2.3
- compat-libstdc++-33-3.2.3 (32 bit)
- elfutils-libelf-0.125
- elfutils-libelf-devel-0.125
- gcc-4.1.2
- gcc-c++-4.1.2
- glibc-2.5-24
- glibc-2.5-24 (32 bit)
- glibc-common-2.5
- glibc-devel-2.5
- glibc-devel-2.5 (32 bit)
- glibc-headers-2.5
- ksh-20060214
- libaio-0.3.106
- libaio-0.3.106 (32 bit)
- libaio-devel-0.3.106
- libaio-devel-0.3.106 (32 bit)
- libgcc-4.1.2
- libgcc-4.1.2 (32 bit)
- libstdc++-4.1.2
- libstdc++-4.1.2 (32 bit)
- libstdc++-devel 4.1.2
- make-3.81
- numactl-devel-0.9.8.x86_64
- sysstat-7.0.2
cd /media/Oracle\ Linux\ Server\ DVD\ 20110119\
cd Server
rpm -Uvh binutils-2.*
rpm -Uvh compat-libstdc++-33*
rpm -Uvh elfutils-libelf-0.*
rpm -Uvh elfutils-libelf-devel-*
rpm -Uvh gcc-4.*
rpm -Uvh gcc-c++-4.*
rpm -Uvh glibc-2.*
rpm -Uvh glibc-common-2.*
rpm -Uvh glibc-devel-2.*
rpm -Uvh glibc-headers-2.*
rpm -Uvh ksh-2*
rpm -Uvh libaio-0.*
rpm -Uvh libaio-devel-0.*
rpm -Uvh libgcc-4.*
rpm -Uvh libstdc++-4.*
rpm -Uvh libstdc++-devel-4.*
rpm -Uvh make-3.*
rpm -Uvh numactl-devel-0.*
rpm -Uvh sysstat-7.*
rpm -Uvh unixODBC-2.*
rpm -Uvh unixODBC-devel-2.*
rpm -Uvh oracleasm-support-2.1.4-1.el.i386.rpm
rpm -Uvh oracleasm-2.6.18-238.el5-2.0.5-1.el5.i686.rpm
- Please add or modify to looks like the following lines in the “/etc/sysctl.conf” file using vi.
- save the changes and run as “root”:
kernel.core_uses_pid = 1
fs.suid_dumpable = 1
fs.aio-max-nr = 1048576
fs.file-max = 6815744
kernel.shmall = 2097152
kernel.shmmax = 536870912
kernel.shmmni = 4096
kernel.sem = 250 32000 100 128
net.ipv4.ip_local_port_range = 9000 65500
net.core.rmem_default = 262144
net.core.rmem_max = 4194304
net.core.wmem_default = 262144
net.core.wmem_max = 1048586
# sysctl -p
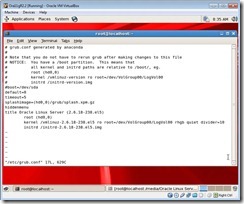
- Now let’s configure the Virtual Machine to reduce the Idle CPU load, to achieve this goal, you just need to edit the file “/etc/grub.conf” and add the words “divider=10” after the word quiet, as show in the picture bellow.
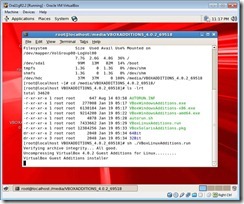
- Next, we will need to Install the Guest Additions, just go to [Devices] –> [Install Guest Additions] than run the following commands:
# cd /media/VBOXADDITIONS_4.0.2_69518
# sh ./VBoxLinuxAdditions.run
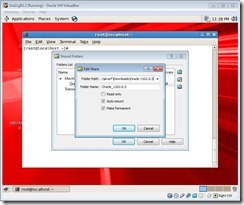
- Now let’s mount the folder with the Oracle software in the virtual machine, go to [Devices] –> [Shared Folders] and add the folder with the Oracle DB and Grid Infrastructure software as per the image bellow.
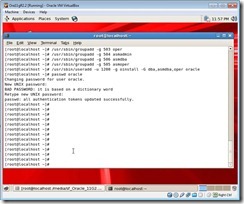
- Now let’s create the new groups and users:
- Enter “oracle1” as the password to the user “oracle”.
# /usr/sbin/groupadd oinstall
# /usr/sbin/groupadd -g 502 dba
# /usr/sbin/groupadd -g 503 oper
# /usr/sbin/groupadd -g 504 asmadmin
# /usr/sbin/groupadd -g 506 asmdba
# /usr/sbin/groupadd -g 505 asmoper
# /usr/sbin/useradd -u 502 -g oinstall -G dba,asmdba,oper oracle
# passwd oracle
- Now we need to install the package “cvuqdisk” to be used when installing the Grid Infrastructure:
# cd /media/sf_Oracle_11G2.0.2
# cd linux_11gR2_grid/grid/rpm
# rpm -Uvh cvuqdisk*
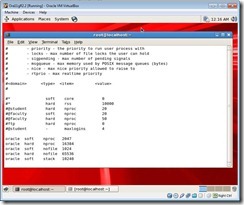
- Now we need to add the following lines to the “/etc/security/limits.conf” file
oracle soft nproc 2047
oracle hard nproc 16384
oracle soft nofile 1024
oracle hard nofile 65536
oracle soft stack 10240
- Add the following line to “/etc/pam.d/login” file:
session required pam_limits.so
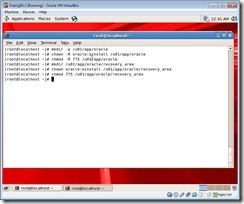
# mkdir -p /u01/app/oracle
# chown -R oracle:oinstall /u01/app/oracle
# chmod -R 775 /u01/app/oracle
# mkdir /u01/app/oracle/recovery_area
# chown oracle:oinstall /u01/app/oracle/recovery_area
# chmod 775 /u01/app/oracle/recovery_area
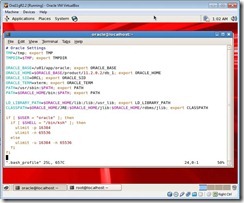
- Now let’s login as “oracle” (remember the password is “oracle1”) and edit the “.bash_profile” as the follow:
# Oracle Settings
TMP=/tmp; export TMP
TMPDIR=$TMP; export TMPDIR

ORACLE_BASE=/u01/app/oracle; export ORACLE_BASE
ORACLE_HOME=$ORACLE_BASE/product/11.2.0.2/db_1; export ORACLE_HOME
ORACLE_SID=ORCL; export ORACLE_SID
ORACLE_TERM=xterm; export ORACLE_TERM
PATH=/usr/sbin:$PATH; export PATH
PATH=$ORACLE_HOME/bin:$PATH; export PATH

LD_LIBRARY_PATH=$ORACLE_HOME/lib:/lib:/usr/lib; export LD_LIBRARY_PATH
CLASSPATH=$ORACLE_HOME/JRE:$ORACLE_HOME/jlib:$ORACLE_HOME/rdbms/jlib; export CLASSPATH

if [ $USER = "oracle" ]; then
  if [ $SHELL = "/bin/ksh" ]; then
    ulimit -p 16384
    ulimit -n 65536
  else
    ulimit -u 16384 -n 65536
  fi
fi
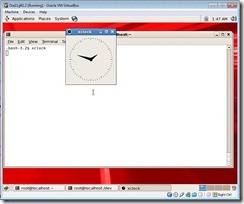
- Now you need to connect as “root” and give to command: xhost + to enable X applications , than connect as “oracle” and run xclock to see if it’s working.
Now we are ready to install the Oracle Grid Infrastructure in the next part of this article, don’t miss the next part it will be post very soon!
Francisco Munoz Alvarez




So…
I’ve been installing Oracle on Linux since 8.1.x and love the way you stepped everyone through the rpm installs etc. Do you know about “oracle-validated?” The following is a whole-lot easier:
1. check hardware requirements (swap, disk, memory)
2. connect to oel public yum server
$> cd /etc/yum.repos.d
$> wget http://public-yum.oracle.com/public-yum-ol6.repo
$> vi public-yum-ol6.repo change the [el4_u6_base] enabled entry to = 1 not 0
3. Install oracle-validated
# yum install oracle-validated
4. Run the installer
# ./runInstaller
You will find that oracle-validated sets up the users, groups, semaphores, oracle limits, and installs all the rpm’s you need, all in one command. That’s so much nicer…
Just a thought
Excelente artículo Francisco !
Solamente indicar que faltaba mencionar:
# mkdir /u01/app/oraInventory
# chown oracle:oinstall /u01/app/oraInventory
# chmod 775 /u01/app/oraInventory
Saludos desde Austria.
Hey Francisco, could you please add the 4th part when possible. have been waiting for a while.
Looking forward
Venkat