Today we will play with an exciting and not very well-known feature within the Oracle Database, called Application Continuity (AC) which is available with the Oracle Real Application Clusters (RAC), Oracle RAC One Node and Oracle Active Data Guard options and it masks outages from end users and applications by recovering the in-flight database sessions following recoverable outages. In simple words, allow your application to achieve extremely high availability at the transaction level by replaying transactions in a survival node (in case of a node failure), or within an available active standby database in case of an outage (Disaster Recovery scenario) with zero downtime for your application.
The Tutorial
This tutorial (you can access this same tutorial and play with it for free on your own time at LiveLabs here) will focus on the basics of deploying Application Continuity (also called Level 1 – Basic Application High Availability) to protect an application from interruptions when a node of Oracle RAC goes down. It would help you to learn about:
- Configure DB Service (scripted) for 3 different scenarios;
- Configure application;
- Inject db instance failure;
- Evaluate replay results;
- Validate FAN with fanWatcher
The Environment and Tutorial
In this tutorial, we will use a 2-node Oracle Real Application Clusters database in the Oracle Cloud as Oracle Cloud Infrastructure (OCI) offers 2-node RAC DB systems on virtual machines. For more information about Virtual DB systems, please click here.
On your RAC cluster, we will define database services. One of these services will have attributes that support Application Continuity, the other will not. We will then configure a sample application to use the AC service and see the benefits AC provides to the application. These benefits will be reinforced by running the same application against a service with no AC characteristics.
Finally, we would examine FAN events, which form the basis for notifying applications when failures occur or when maintenance is due to start. FAN events play a role in outage detection and also when draining for maintenance.
Oracle Application Continuity provides:
- Continuous availability for applications

The LiveLabs Environment
When on the tutorial page, to start the environment, all we would need to do is click on the start the lab icon and select the “Run on LiveLabs Sandbox” option as shown in the image below (This would create the tutorial environment for free at OCI (Oracle Cloud Infrastructure) without requiring us to create an account or enter any credit card information – all that is required is your free Oracle.com account credentials (If you do not have a free account yet, please create it here).

The next step would be to select our time zone (1), inform if we would like to start the workshop/tutorial now or not (2), check the public SSH key for this tutorial (3), and finally consent to receive emails from LiveLabs and confirm that we will not upload any sensitive information to OCI (4). Then click on the “Submit Reservation” button (5) to submit the environment reservation request.

We will then be redirected to the “My Reservations” page and there we will see that the environment is being created.

We should also receive an email informing us that the reservation is being processed and another email will be received when the environment is ready to be used.

As soon we are informed that the reservation is ready, we can access the “My Reservations” page and click on the “Launch Workshop” button to access the environment.

When on the reservation page, please feel free to check the two introductions available to learn more details about this tutorial as shown in the image below.


Next, let’s click on the “View Login info” link (on the top left corner of the screen) and it will open a popup with all the information required to use the OCI environment – from here always take note of the region used by the environment and the compartment. Feel free to click on the link as many times as needed during the tutorial. Note that the first time connecting to OCI it will require you to change the initial password to one of your preferences, here you can also reset the password if you forget it.

Introduction to Application Continuity
Application Continuity (AC) is a helpful feature that comes with Oracle database systems using Real Application Clusters (RAC), RAC One Node, and/or Active Data Guard. It works like a safety net that catches and fixes problems when outages happen, so users and their work aren’t interrupted. Think of it as a magic trick that quickly picks up where things left off without the user noticing more than a slight delay.
This feature makes things smoother when there’s maintenance work to be done or when unexpected issues pop up, keeping the Oracle database and the applications using it running more reliably.
Application Continuity and MAA
Oracle MAA is a framework based on the collection of architecture, configuration, and life cycle best practices and blueprints, providing Oracle’s customers with valuable insights and expert recommendations that have been validated and tested by enterprise customers to improve their data High Availability and Disaster Recovery capabilities. This is also an outcome of ongoing communication with the community of database architects, software engineers, and database strategists that help Oracle to develop a deep and complete understanding of various kinds of events that can affect availability or data integrity (For example: planned and unplanned events). Over the years, this led to the development and natural evolution of an array of available reference architectures.

Furthermore, Application Continuity extends the MAA architecture to the application tier.
Time to Play
Now it is time to have some fun. Let’s start by logging into OCI Console to prepare the environment.

As mentioned before, we will be required to change the initial password within the first login.

Open up the hamburger menu in the left-hand corner, and from it, select Oracle Base Database Service in the Oracle Database category. Also, remember to check that the region we are connected to is the same one shown in the login information page/popup.

Make sure to identify our compartment (5) as per the “My Reservations page in LiveLabs and click on the available database system (4) pre-created for the tutorial.

Explore the DB Systems home page. On the left-hand side, scroll down to view the Resources section and click on the Nodes tab.

Locate your two nodes and take note of their public IP addresses/names (bellow data is for example purposes only):
- Node 1 Name: lvracdb-s01-2024-01-25-0102531
- Node 1 Public IP: 168.138.140.146
- Node 2 Name: lvracdb-s01-2024-01-25-0102532
- Node 2 Public IP: 140.238.190.131
- Note the Host domain name which in my LiveLabs case will be pub.ll73787vcn.oraclevcn.com.

- The next step would be to download the SSH keys to allow us to access the nodes directly, for that we would need to click on the “Add SSH keys” button as per the image below.

Next, we need to make sure the option “Generate SSH key pair” is selected, and then download both, private and public keys.

To start the Oracle Cloud Shell, we would click on the Cloud Shell icon at the top right of the page.

It would open the Oracle Cloud Shell interface, and to make it easier to use, let’s expand the window as shown below.


The next step would be to upload the SSH Key we previously downloaded from the Database Service console. For this, we would need to click on the setup icon and select Upload.

Next, we would click on the “Select from your computer” option , select our key previously downloaded and then click on Upload.


Now we can run a simple “ls” command to check if the key was uploaded to the Oracle Cloud Shell interface.

Next, we would change the permissions on the key file by running the command “chmod 600 <key-file>”.

Using one of the Public IP addresses previously collected for the RAC nodes, enter the command below to login as the opc user and verify the connection to our nodes.
ssh -i <SSH-Key> opc@<Node 1 Public IP> As per our example:
$ ssh -i ssh-key-2024-01-25.key opc@168.138.140.146

Playing with Oracle Database Services – The Foundation
Once we’ve made sure we can connect to the database nodes, we can now start working with our Oracle database services. Think of services as collections of programs that share similar features and importance. The tasks that these programs do can be sorted into different services. This way, you can organize the workload by type. For instance, people using the database in real-time might use one service, while another service is used for scheduled data processing and a third one for generating reports.
A service can span one or more instances of an Oracle database, multiple databases in a global cluster, and a single instance can support multiple services. The number of instances that are serving the service is transparent to the application. Services provide a single system image to manage competing applications and allow each workload to be managed as a single unit.
Response time and CPU consumption metrics, performance and resource statistics, wait events, threshold-based alerts, and performance indexes are maintained by the Automatic Workload Repository automatically for all services. Service, module and action tags are used to identify operations within a service at the server. (MODULE and ACTION are set by the application). End-to-end monitoring enables aggregation and tracing at Service, Module and Action levels to identify the high load operations. Oracle Enterprise Manager administers the service quality thresholds for response time and CPU consumption, monitors the top services, and provides drill down to the top modules and top actions per service.
Connect time routing and runtime routing algorithms balance the workload across the instances offering a service. RAC uses services to enable uninterrupted database operations. Planned operations are supported through interfaces that allow the relocation or disabling/enabling of services.
It is very important to understand that Application Continuity is set as an attribute of a database service.
Oracle recommends that all users who share a service have the same service level requirements. You can define specific characteristics for services and each service can represent a separate unit of work. There are many options that you can take advantage of when using services. Although you do not have to implement these options, using them helps optimize application operation and performance.
For more information on Oracle Database Services visit https://www.oracle.com/database/technologies/high-availability/app-continuity.html
Login and Identify Database and Instance Names
We have already identified our database name and instance name. Each place in this lab where you see <replacename> please make sure to use your correct instance and database names as per your reservation.
- If you aren’t already logged in to the Oracle Cloud, open up a web browser and re-login to Oracle Cloud.
- Once you are logged in, open up a 2nd web browser tab.
- Start Cloud Shell in each. Maximize both cloud Shell instances.
Note: You can also use Putty or MAC Cygwin if you prefer those formats.
Connect to node 1 as the opc user (you identified the IP address of node 1.
ssh -i <SSH-Key> opc@<Node 1 Public IP> 
Now let us repeat this step for node 2.

The next step would be to take note of each instance name running by running the following command on each node:
$ ps -ef | grep pmon
Next, we would run a command to determine our database name and additional information about our cluster on node 1. Run this as the grid user.
$ sudo su - grid
$ crsctl stat res -t


Let’s find our database name in the Cluster Resources section with the .db. Take note of this information, as we will need it later.

Creating a Service
NOTE For simplicity we will often use the EZConnect syntax to specify connect strings to the database:
user/password@//hostname:port/servicenameEZConnect does not support all service characteristics. A fully specified URL or TNS Connect String is required for Application Continuity and other service characteristics.
To start, we will create a new service called svctest with instance1 as a preferred instance and instance2 as an available instance. This means that the service will normally run on instance1 but will failover on instance2 if the first instance becomes unavailable. Now let’s run these commands on node 1.
Note: Remember to replace all instances names and database name as previously identified with the ps -ef and crsctl commands.
exit sudo su - oracle

srvctl add service -d <database_replacename> -s svctest -preferred <instance1_replacename> -available <instance2_replacename> -pdb pdb1

srvctl start service -d <database_replacename> -s svctest
So, taking into consideration the previously shown information, in our case the commands would be:
$ exit
$ sudo su - oracle
$ srvctl add service -d racsmovh_dtp_gru -s svctest -preferred racSMOVH1 -available racSMOVH2 -pdb pdb1
$ srvctl start service -d racsmovh_dtp_gru -s svctest
Now, it is time to examine where the service is running by using lsnrctl to check the SCAN listener or a local listener on each node. srvctl will also show you where the service is running.
srvctl status service -d <database_replacename> -s svctest
Next, we would use the lsnrctl utility to list the services on both node 1 and node 2 as the grid user.
$ ORACLE_HOME=/u01/app/19.0.0.0/grid
$ $ORACLE_HOME/bin/lsnrctl services 


Note that this service is only active on one instance at a time, so both local listeners will not include an entry for this service. In the example shown here, the listener on racnode2 would not have an entry for *Service “svctest.pub.ll73787vcn.oraclevcn.com”
Any of the SCAN listeners will show where the service is offered. Note that SCAN Listeners run from the GI HOME so you have to change the ORACLE_HOME environment variable to view the information about the SCAN Listeners. Run the lsnrctl command below on node 2 as the grid.
$ export ORACLE_HOME=/u01/app/19.0.0.0/grid
$ $ORACLE_HOME/bin/lsnrctl service LISTENER_SCAN2
Repeat it on node 1 as well.

Service Failover
Now we would cause the service to fail over. After identifying which instance the service is being offered on, kill that instance by removing the SMON process at the operating system level. Run this on node 1.
$ ps -ef | grep ora_smon
In this example, the process ID is 15326, which we can pass to the kill -9 command. When running your own lab remember to Identify your process ID and issue the kill command as the oracle user
$ sudo kill -9 15326
This will cause the instance to fail, and any connections to the database on this instance will be lost. The CRS component of Grid Infrastructure would detect the instance failure, and immediately start the service on an available instance (based on the service definition). CRS would then restart the database instance.
Rerun the srvctl status service command and notice that the service has failed over to the other instance:
srvctl status service -d <database_replacename> -s svctestDepending on where our service was running beforehand, we will notice something similar to

Now let’s manually relocate the service. For this, we will open a connection (with SQL*Plus) to the instance where the service is running. We will use the SCAN address and the domain-qualified service name in the format:
**sqlplus user/password@//SCAN Address Name/service-name**
Connect via sqlplus and replace the password with the password you chose for your cluster (If you did not choose a password on your reservation use the default password as per the example below).
$ sqlplus system/W3lc0m3#W3lc0m3#@//lvracdb-s01-2024-01-25-010253-scan.pub.ll73787vcn.oraclevcn.com/svctest.pub.ll73787vcn.oraclevcn.com
Using a different Cloud Shell window (connected to either node) open a SQL*Plus connection as SYS to the PDB associated with this service
$ sqlplus sys/W3lc0m3#W3lc0m3#@lvracdb-s01-2024-01-25-010253-scan.pub.ll73787vcn.oraclevcn.com/racSMOVH_pdb1.pub.ll73787vcn.oraclevcn.com as sysdba

and run the following SQL statement:
set wrap off
col service_name format  a20
select inst_id, service_name, count(*)
from gv$session
where service_name = 'svctest'
group by inst_id, service_name;

Now let us relocate the service by using the command srvctl. Execute the command below on node 2
srvctl relocate service -d <database_replacename> -s svctest -oldinst <instance2_replacename> -newinst <instance1_replacename>
Now, let us re-examine the v$session information:
SQL>/

INST_ID     SERVICE_NAME         COUNT(*)
---------- -------------------- ----------
         1 svctest                       1
So as we can see above, It has not changed. The relocate service command will not disconnect active sessions unless a force option (-force) is specified. A stop service command will allow a drain timeout to be specified to allow applications to complete their work during the drain interval.
Services Configured for Application Continuity
Now that we know how a normal database service would behave, it is time to see how FAN, the connection identifier, TAC, AC, switchover, consumer groups, and many other features and operations are predicated on the use of services.
Important: Do not use the default database service (the service created automatically with the same name as the database or PDB) as this service cannot be disabled, relocated, or restricted and so it has no high availability support. The services associated with a specific primary or standby role in a Data Guard environment should also not be used, and finally, do not use the initialization parameter service_names for application usage.
Note: We can use the srvctl command to find our database name:
$ srvctl config database
When some attributes are set on a service it would enable applications to use Application Continuity. For that all we need to do is to create a service, setting some attributes like failover_restore, commit_outcome, and failovertype for Application Continuity (AC).
- failover_restore – When set to “LEVEL1” it restores the common initial session states. Application Continuity uses a labelling callback or reconnects callback if an application also sets initial session states that are not provided by FAILOVER_RESTORE;
- commit_outcome – When set to “TRUE” it enables Transaction Guard;
- failovertype – When set to “TRANSACTION” it enables Application Continuity.
Transaction Guard provides a generic infrastructure for applications to use for at-most-once execution during planned and unplanned outages and duplicate submissions. Applications use the logical transaction ID to determine the outcome of the last transaction open in a database session following an outage.
Without Transaction Guard, applications that attempt to replay operations following outages can cause logical corruption by committing duplicate transactions.
Transaction Guard provides these benefits:
- Preserves the committed outcome;
- Ensures a known outcome for every transaction;
- Provides at-most-once transaction execution.
When enabling Transaction Guard, remember to grant permission on the Transaction Guard package, DBMS_APP_CONT, to the database users that failover using Application Continuity, as follows:
GRANT EXECUTE ON DBMS_APP_CONT TO user_name;Notre: when creating the next services, please replace the values for “-d”, “-s”, “-preferred” and “-available” with those of your system. We will create two new services, one using AC and another not using AC.
srvctl add service -d (addDatabaseName) -s (myServiceName) -commit_outcome TRUE -failovertype TRANSACTION -failover_restore LEVEL1 -preferred (YourInstance1) -available (YourInstance2) -pdb pdb1 -clbgoal LONG -rlbgoal NONE So, taking into consideration my reservation details information the command would be:
$ srvctl add service -d racSMOVH_dtp_gru -s withac -commit_outcome TRUE -failovertype TRANSACTION -failover_restore LEVEL1 -preferred racSMOVH1 -available racSMOVH2 -pdb pdb1 -clbgoal LONG -rlbgoal NONE

Create a service named noac with no AC settings.
$ srvctl add service -d racSMOVH_dtp_gru -s noac -commit_outcome FALSE -failovertype NONE -failover_restore NONE -preferred racSMOVH1 -available racSMOVH2 -pdb pdb1 -clbgoal LONG -rlbgoal NONE 
Next, we will start both services as shown below:
srvctl start service -d (addDatabaseName) -s (myServiceName)

$ srvctl start service -d racSMOVH_dtp_gru -s noac
$ srvctl start service -d racSMOVH_dtp_gru -s withac

The two services you have just created (one named noac and another named withac) will be used in the next section of the tutorial.
Playing with Application Continuity
Installing sample program and configuring the services
- If you aren’t already logged in to one of your cluster nodes, connect to a node using either Putty, MAC or Windows CYGWIN Emulator or the Oracle Cloud Shell Interface.
- Connect to the oracle user and download the sample program from the Object Store
$ wget 
- Unzip the ACDemo_19c.zip file
$ cd /home/oracle
$ unzip ACDemo_19c.zip

The directory acdemo will be created with the following structure:
unzip ACDemo_19c.zip
Archive:  ACDemo_19c.zip
creating: acdemo/
   creating: acdemo/classes/
   creating: acdemo/lib/
   creating: acdemo/src/
   creating: acdemo/win/
inflating: README.txt
inflating: SETUP_AC_TEST.sh- Set the execute bit +x on the SETUP_AC_TEST.sh script
$ chmod +x SETUP_AC_TEST.sh- Run the script SETUP_AC_TEST.sh. You will be prompted for INPUTS. If a default value is shown, press ENTER to accept
$ ./SETUP_AC_TEST.shYou will need to provide the password for the SYSTEM user – this is “W3lc0m3#W3lc0m3#” (without the quotation marks ” “) Choose a name for your service. If this installation is not on the database tier many of the inputs will not have default values.
On completion three services will be created Note: If services of the same name existed before running this script these services will have their original attributes – SETUP_AC_TEST does not attempt to modify them


- Make the run scripts executable
$ cd /home/oracle/acdemo
$ chmod +x run*
$ chmod +x kill_session.sh
Examine Service Attributes and Program Settings
Application Continuity (whether AC or TAC) is enabled by setting attributes on the database service. For JDBC applications the Replay Driver also has to be used.
So, we would now examine the services that have been created – identifying the AC attributes
- Identify your service names:
$ srvctl status service -d `srvctl config database`You should see at least 3 services: noac, ac_service, and withac.

Examine the service characteristics (replacing the service name (in red) in the command below for each service)
Note: that the sample command below discovers the database name (if there is only 1 database on your system):
$ srvctl config service -d `srvctl config database` -s noac
The attributes commit_outcome, failovertype, and failover_restore are those that set whether AC is enabled or not. For the “noac” service, AC is not enabled as commit_outcome is false and failovertype is NONE.
For the service created with TAC enabled called tac_service, the attributes commit_outcome is set to TRUE, failovertype is set to AUTO, and failover_restore is set to AUTO, enabling TAC.
$ srvctl config service -d `srvctl config database` -s tac_service
Note: The attributes failoverretry and failoverdelay are not required when RETRY_COUNT and RETRY_DELAY are set in the connect string/URL as recommended
Examine the setting for the AC-enabled service you created. You should see that commit_outcome is TRUE, failovertype is TRANSACTION and failover_restore is LEVEL1.
- The sample program described The sample program is called acdemo. There is an acdemo directory in the oracle users home directory (if you unpacked the ZIP file here). The acdemo directory contains:
classes/
    acdemo/    <--- Compiled versions of the acdemo application classes
lib/           <--- The JDBC libraries and the packaged acdemo classes in acdemo.jar
src/
   acdemo/
      ACDemo.java             <-- main program file
      Worker.java             <-- worker threads that do the database operations
      PrintStatsThread.java   <--- Prints database stats periodically
      PrintACStatsThread.java <-- disabled, but would print client-side AC  stats
win/           <--- windows control scripts (under development)
ac_noreplay.properties        <--- property file to configure ACDemo for no replay operations
ac_replay.properties          <--- property file to configure ACDemo for AC replay operations
tac_replay.properties         <--- property file to configure ACDemo for TAC replay operations
runreplay                     <--- shell script to start ACDemo using ac_replay.properties file
runnoreplay                   <--- shell script to start ACDemo using ac_noreplay.properties file
runtacreplay                  <--- shell script to start ACDemo using ac_replay.properties file
kill_session.sh               <--- shell script to kill database sessions connected to a named service
build.xml                     <--- A buildfile for ANT (ANT not installed on these systems)
NO Replay
- Run the sample program with NO REPLAY enabled
A key tenet of Application Continuity is that no application changes are required. We manage this sample application with a property file. We use a SHELL script to set the environment and select the property file that will produce a certain behaviour.
Examine the ac_noreplay.properties file to see that we are using a pooled datasource oracle.jdbc.pool.OracleDataSource but we have disabled FAN, fastConnectionFailover=FALSE and connection tests validateConnectionOnBorrow=FALSE. The URL uses the recommended format and connects to the service noac, which has no AC attributes set.

$ cd /home/oracle/acdemo
$ ./runnoreplay
The application will start, create a connection pool, and begin issuing transactions against the database.

- Kill the instance or kill sessions attached to the database
$ srvctl status service -d `srvctl config database` -s noac

This will return an instance name, for example:
$ srvctl status service -d `srvctl config database` -s noac
  Service noac is running on instance(s) racSMOVH1
The instance number (in this example “2”) shows that the instance is running on node 2 Connect to the node containing that instance
$ ps -ef | grep ora_smon

oracle    7802     1  0 09:14 ?        00:00:00 ora_smon_racSMOVH1
oracle   75402 73770  0 12:12 pts/1    00:00:00 grep --color=auto ora_smon
Get the process number of the ora_smon_ process – in this example, 7802 Pass this process ID to a kill -9 command
kill -9 <process id>

$ kill -9 7802
The application will see errors from the database and will fall into its own error-handling routines

It can take some time for the system to correct and recover, but provided that the application does not time out, or has not reached some error thresholds (that the application sets for itself), connections can be re-established and activity recommences
There is also a script named kill_sessions.sh in the acdemo/ directory that can be used to forcibly kill the database sessions. This script takes the service name as an argument (as it needs to connect to the same instance as the application to identify the sessions)
$ cd /home/oracle/acdemo
$ ./kill_session.sh noac.pub.racdblab.oraclevcn.com
Application Continuity
- Examine the ac_replay.properties file to see that we are using a replay datasource oracle.jdbc.replay.OracleDataSourceImpl and we have enabled FAN, fastConnectionFailover=TRUE and connection tests validateConnectionOnBorrow=TRUE. The URL uses the recommended format and connects to the service you created previously, which has AC attributes set.

$ cd /home/oracle/acdemo
$ ./runreplay
The application will start, create a connection pool, and begin issuing transactions against the database using an AC-enabled service. Both FAN and connection tests are enabled

Note: ONS is auto-configured. The “ONS Configuration” heading in the banner is only populated if ONS is manually configured [which is not recommended]
- Crash the instance by killing SMON
Substitute your AC service in the command below (in this example my AC-enabled service is named ac_service)
srvctl status service -d `srvctl config database` -s ac_service
ps -ef | grep ora_smon
kill -9 mySMONPID
As per example:

$ Kill -9 77062 No errors occur. Application Continuity traps the error(s), re-establishes connections at a surviving instance, and replays any uncommitted transactions. We do not progress into any of the application’s error-handling routines
2 borrowed, 0 pending, 0ms getConnection wait, TotalBorrowed 10467, avg response time from db 10ms10 borrowed, 0 pending, 0ms getConnection wait, TotalBorrowed 10485, avg response time from db 9ms10 borrowed, 0 pending, 0ms getConnection wait, TotalBorrowed 1048510 borrowed, 0 pending, 0ms getConnection wait, TotalBorrowed 1048510 borrowed, 0 pending, 0ms getConnection wait, TotalBorrowed 1048510 borrowed, 0 pending, 0ms getConnection wait, TotalBorrowed 1048510 borrowed, 0 pending, 0ms getConnection wait, TotalBorrowed 1048510 borrowed, 0 pending, 0ms getConnection wait, TotalBorrowed 1048510 borrowed, 0 pending, 0ms getConnection wait, TotalBorrowed 1048510 borrowed, 0 pending, 0ms getConnection wait, TotalBorrowed 104852 borrowed, 0 pending, 0ms getConnection wait, TotalBorrowed 10721, avg response time from db 1993ms0 borrowed, 0 pending, 0ms getConnection wait, TotalBorrowed 11535, avg response time from db 8ms1 borrowed, 0 pending, 0ms getConnection wait, TotalBorrowed 12363, avg response time from db 7ms2 borrowed, 0 pending, 0ms getConnection wait, TotalBorrowed 13189, avg response time from db 7ms
You should notice that there is a response time increase as services are failed over and connections re-established. But no errors.
Transparent Application Continuity
- Examine the tac_replay.properties file to see that we are using a replay datasource oracle.jdbc.replay.OracleDataSourceImpl and we have enabled FAN, fastConnectionFailover=TRUE and connection tests validateConnectionOnBorrow=TRUE. The URL uses the recommended format and connects to the service you created previously, which has AC attributes set.

$ cd /home/oracle/acdemo
$ ./runtacreplay
The application will start, create a connection pool, and begin issuing transactions against the database using a TAC-enabled service. Both FAN and connection tests are enabled
Note: ONS is auto-configured. The “ONS Configuration” heading in the banner is only populated if ONS is manually configured [which is not recommended]
- Now Crash the instance by killing SMON
Substitute your AC service in the command below (in this example my AC-enabled service is named ac_service)
srvctl status service -d `srvctl config database` -s ac_service
ps -ef | grep ora_smon
kill -9 mySMONPID
For example:

$ Kill -9 77062
No errors occur. Transparent Application Continuity traps the error(s), re-establishes connections at a surviving instance, and replays any uncommitted transactions. We do not progress into any of the application’s error-handling routines
$ ./runtacreplay
######################################################
Connecting to jdbc:oracle:thin:@(DESCRIPTION=(CONNECT_TIMEOUT=90)(RETRY_COUNT=50)(RETRY_DELAY=3)(TRANSPORT_CONNECT_TIMEOUT=3)
(ADDRESS_LIST=(ADDRESS=(PROTOCOL=tcp)(HOST=lvracdb-s01-2021-03-30-204603-scan.pub.racdblab.oraclevcn.com)(PORT=1521)))
(CONNECT_DATA=(SERVICE_NAME=tac_service.pub.racdblab.oraclevcn.com)))
# of Threads             : 10
UCP pool size            : 20
FCF Enabled:  true
VCoB Enabled: true
ONS Configuration:  null
Thread think time        : 50 ms
######################################################
Starting the pool now... (please wait)
Pool is started in 4403ms
6 borrowed, 2 pending, 0ms getConnection wait, TotalBorrowed 645, avg response time from db 15ms
0 borrowed, 0 pending, 0ms getConnection wait, TotalBorrowed 1442, avg response time from db 9ms
5 borrowed, 1 pending, 0ms getConnection wait, TotalBorrowed 2240, avg response time from db 9ms
1 borrowed, 0 pending, 1ms getConnection wait, TotalBorrowed 2809, avg response time from db 29ms
1 borrowed, 0 pending, 1ms getConnection wait, TotalBorrowed 3492, avg response time from db 18ms
1 borrowed, 0 pending, 0ms getConnection wait, TotalBorrowed 4294, avg response time from db 9ms
2 borrowed, 0 pending, 0ms getConnection wait, TotalBorrowed 5126, avg response time from db 7ms
You should notice that there is a response time increase as services are failed over and connections re-established. But no errors.
- Run the kill_session.sh script
$ cd /home/oracle/acdemo
$ ./kill_session.sh tac_service.pub.racdblab.oraclevcn.com
SQL>
'ALTERSYSTEMKILLSESSION'''||SID||','||SERIAL#||'''IMMEDIATE;'
--------------------------------------------------------------------------------
ALTER SYSTEM KILL SESSION '21,60564' IMMEDIATE;
ALTER SYSTEM KILL SESSION '24,27022' IMMEDIATE;
ALTER SYSTEM KILL SESSION '26,59121' IMMEDIATE;
ALTER SYSTEM KILL SESSION '29,8643' IMMEDIATE;
ALTER SYSTEM KILL SESSION '30,61221' IMMEDIATE;
ALTER SYSTEM KILL SESSION '34,8113' IMMEDIATE;
ALTER SYSTEM KILL SESSION '185,19980' IMMEDIATE;
1 borrowed, 0 pending, 1ms getConnection wait, TotalBorrowed 2809, avg response time from db 29ms
1 borrowed, 0 pending, 1ms getConnection wait, TotalBorrowed 3492, avg response time from db 18ms
1 borrowed, 0 pending, 0ms getConnection wait, TotalBorrowed 4294, avg response time from db 9ms- TAC will protect applications that do or do not use a connection pool
Let’s look at a SQL*Plus example.
- Connect to the database with SQL*Plus as the HR user over the TAC-enabled service
sqlplus hr/W3lc0m3#W3lc0m3#@"(DESCRIPTION=(CONNECT_TIMEOUT=90)(RETRY_COUNT=50)(RETRY_DELAY=3)(TRANSPORT_CONNECT_TIMEOUT=3)(ADDRESS_LIST=(ADDRESS=(PROTOCOL=tcp)(HOST=lvracdb-s01-2021-03-30-204603-scan.pub.racdblab.oraclevcn.com)(PORT=1521)))(CONNECT_DATA=(SERVICE_NAME=tac_service.pub.racdblab.oraclevcn.com)))"Update a row in the table EMP4AC.
For example:
select empno, ename
from emp4ac
where rownum <10;

     EMPNO ENAME
   ---------- ----------
    8504 Bob8504
    1785 Bob1785
    2998 Bob2998
    107 Bob107
    9988 Bob9988
    6277 Bob6277
    4121 Bob4121
    2459 Bob2459
    7770 Bob7770
   9 rows selected.

update emp4ac set empno=9999 where empno=8504 and ename='Bob8504' and rownum < 10;
From another terminal window run the kill_session.sh script against the TAC-enabled service
$ kill_session.sh tac_service.pub.racdblab.oraclevcn.comAn alter system kill session command will be run:
SQL> ALTER SYSTEM KILL SESSION '190,9611' IMMEDIATE;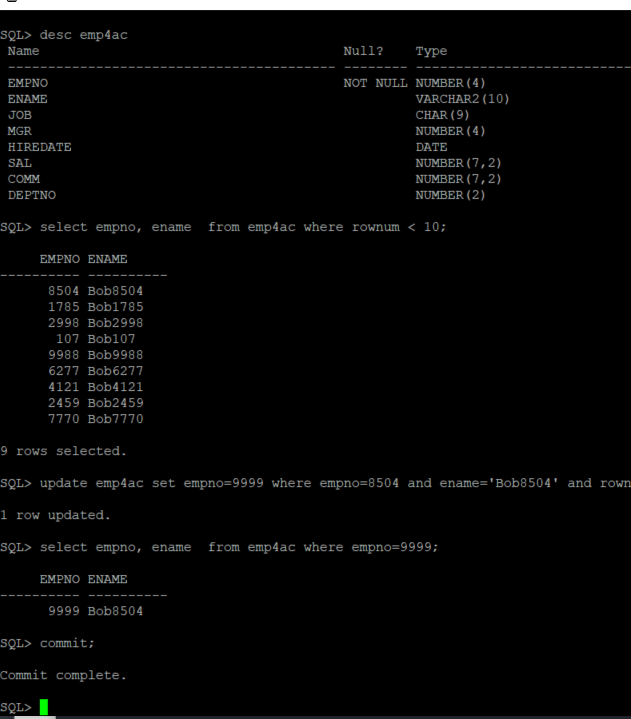
What happens to the SQL*Plus session?
Perform another update and commit
SQL> update emp4ac set empno=8504 where empno=9999 and rownum <10;
    1 row updated.
SQL> commit;
    Commit complete.
Try the same procedure using the AC-enabled service
SQL> select empno, ename  from emp4ac where rownum < 10;
 EMPNO ENAME
---------- ----------
  8504 Bob8504
  1785 Bob1785
  2998 Bob2998
   107 Bob107
  9988 Bob9988
  6277 Bob6277
  4121 Bob4121
  2459 Bob2459
  7770 Bob7770
     9 rows selected.
   SQL> update emp4ac set empno=9999 where empno=8504 and ename='Bob8504' and rownum < 10;
    1 row updated.
SQL> commit;
   Commit complete.

SQL>  select empno, ename  from emp4ac where rownum < 10;
 EMPNO ENAME
---------- ----------
  9999 Bob8504
  1785 Bob1785
  2998 Bob2998
   107 Bob107
  9988 Bob9988
  6277 Bob6277
  4121 Bob4121
  2459 Bob2459
  7770 Bob7770

9 rows selected.
SQL> update emp4ac set empno=8504 where empno=9999 and ename='Bob8504' and rownum < 10;
    1 row updated.
 SQL> commit;
ERROR:
ORA-41409: cannot replay committed transaction; failover cannot continue
A COMMIT signals to application continuity to disable replay until the next request. For AC, this is typically a getConnection() call (from a pool). SQL*Plus is not pooled. TAC, however, enables protection on the next call – hence protection continues.
Playing with Fast Application Notification
Fast Application Notification (FAN) it is not required from your own application’s perspective to implement this functionality, as most Oracle components are FAN-aware and perform configuration and responses automatically.
It is important to learn about Oracle Clusterware’s FAN callout capability and how events are sent to the application tiers. Fast Application Notification (FAN), is a critical component towards solving the poor experience that end users can encounter when planned maintenance, unplanned outages, and load imbalances occur that make database instances unavailable or unresponsive. FAN enables end-to-end, lights-out recovery of applications and load balancing at runtime based on real transaction performance.
FAN is configured and runs automatically when you install Oracle Grid Infrastructure. All Oracle clients are FAN-aware and versions later than Oracle Database 12c Release 2 will auto-configure the FAN communication path. There is another lesson showing FAN at the application tier.
About FAN Callouts
FAN callouts provide a simple yet powerful integration mechanism available with RAC that can be deployed with minimal programmatic efforts. A FAN callout is a wrapper shell script or pre-compiled executable written in any programming language that is executed each time a FAN event occurs. The purpose of the FAN callout is for simple logging, filing tickets and taking external actions. The purpose of the callout is not for integrated client failover –The FAN client failover is Fast Connection Failover in the next section. Except for node and network events (which act on all nodes), a FAN callout executes for the FAN events that are generated locally to each node and thus only for actions affecting resources on that node
For more information about FAN, click here to view the technical paper.
Write a Callout
- On each node (node 1 and node 2), switch to the grid user, change into the racg/usrco directory under the GI home
$ sudo su - grid
$ cd /u01/app/19.0.0.0/grid/racg/usrco/
- Create a file named callout-log.sh using an editor (vim and vi are installed).
- Click the command to edit the file with vi
$ vi callout-log.sh- Type i to switch to insert mode. Copy the following lines and paste it into the vi editor. Click esc, :wq! to save it.
#!/usr/bin/bash
umask 022
FAN_LOGFILE=/tmp/`hostname -s`_events.log
echo $* " reported = "`date` >> ${FAN_LOGFILE} &
This callout will place an entry in the log file (FAN_LOGFILE) with the time (date) the event was generated, whenever a FAN event is generated,
- Repeat this for node 2.
- Ensure that the callout file has the execute bit set. Repeat this on both nodes.
$ chmod +x /u01/app/19.0.0.0/grid/racg/usrco/callout-log.sh
$ ls -al
Ensure that the callout directory has write permissions only to the system user who installed Grid Infrastructure (in our case, grid) and that each callout executable or script contained therein has execute permissions only to the same Grid Infrastructure owner. Each shell script or executable has to be able to run when called directly with the FAN payload as an argument.
- Verify that the file exists on both nodes
$ ls -al
total 12
drwxr-xr-x 2 grid oinstall 4096 Feb 7 10:26 .
drwxr-xr-x 6 grid oinstall 4096 Feb 7 04:47 ..
-rwxr-xr-x 1 grid oinstall 119 Feb 7 10:26 callout-log.sh- Exit out of the grid user
$ exitGenerate an Event
Stopping or starting a database instance, or a database service will generate a FAN event. A failure of an instance, a node, or a public network will generate an event.
- Run the command to determine your database name and additional information about your cluster. Run this as the grid user
$ sudo su - grid
$ crsctl stat res -t


- Find your database name in the Cluster Resources section. Replace the replacename with the name of your database. Stop the database instance on node1 using srvctl
$ /u01/app/oracle/product/19.0.0.0/dbhome_1/bin/srvctl stop instance -d <database_replacename> -i <instance1_replacename>- Check the instance status
$ /u01/app/oracle/product/19.0.0.0/dbhome_1/bin/srvctl status database -d <database_replacename>- If your callout was written correctly and had the appropriate execute permissions, a file named hostname_events.log should be visible in the /tmp directory
$ ls -altr /tmp/<hostname>*.log- Examine the contents of the racnodexx_events.log file
$ cat /tmp/<hostname>*.log- Depending on which instance you stopped you will see an entry similar to the following:
INSTANCE VERSION=1.0 service=atfdbvm_replacename.tfexsubdbsys.tfexvcndbsys.oraclevcn.com database=atfdbvm_replacename instance=aTFdbVm1 host=racnode1 status=down reason=USER timestamp=2024-02-7 10:41:07 timezone=+00:00 db_domain=tfexsubdbsys.tfexvcndbsys.oraclevcn.com reported = Wed Feb 7 10:41:07 UTC 2020- This is an INSTANCE event, a stop event as reason=down, it occurred on the host=racnode1 and it was user-initiated via reason=USER. Note that there will be no entry for this event on racnode2 as most events are local to the host on which they occur. The exceptions are node and network events which will generate an identical entry on all nodes in the cluster. If you did not get an entry similar to the above there is a problem with your script. Execute the script directly and correct any errors. For example:
$ sh -x /u01/app/19.0.0.0/grid/racg/usrco/callout-log.sh ABCCreate a More Elaborate Callout
Callouts can be any shell script or executable. There can be multiple callouts in the racg/usrco directory and all will be executed with the FAN payload as arguments. The scripts are executed sequentially, so it is not recommended to have many scripts in this directory, as they could place a load on the system that is not desired, and there may be timeliness issues if the scripts wait for scheduling.
- A script may perform actions related to the eventtype. eventtype can be one of SERVICE, SERVICEMEMBER, INSTANCE, DATABASE or NODE. The following example will filter on the eventtype looking for a NODE, DATABASE or SERVICE event. If the FAN payload indicates a DOWN event for these eventypes it will perform a different action than for all other events.
#!/usr/bin/bash
    # Scan and parse HA event payload arguments:
    #
    # define AWK
    AWK=/bin/awk
    # Define a log file to see results
    FAN_LOGFILE=/tmp/`hostname -s`.log
    # Event type is handled differently
    NOTIFY_EVENTTYPE=$1
    for ARGS in $*; do
        PROPERTY=`echo $ARGS | $AWK -F "=" '{print $1}'`
        VALUE=`echo $ARGS | $AWK -F "=" '{print $2}'`
        case $PROPERTY in
          VERSION|version) NOTIFY_VERSION=$VALUE ;;
          SERVICE|service) NOTIFY_SERVICE=$VALUE ;;
          DATABASE|database) NOTIFY_DATABASE=$VALUE ;;
          INSTANCE|instance) NOTIFY_INSTANCE=$VALUE ;;
          HOST|host) NOTIFY_HOST=$VALUE ;;
          STATUS|status) NOTIFY_STATUS=$VALUE ;;
          REASON|reason) NOTIFY_REASON=$VALUE ;;
          CARD|card) NOTIFY_CARDINALITY=$VALUE ;;
          VIP_IPS|vip_ips) NOTIFY_VIPS=$VALUE ;; #VIP_IPS for public_nw_down
          TIMESTAMP|timestamp) NOTIFY_LOGDATE=$VALUE ;; # catch event date
          TIMEZONE|timezone) NOTIFY_TZONE=$VALUE ;;
          ??:??:??) NOTIFY_LOGTIME=$PROPERTY ;; # catch event time (hh24:mi:ss)
        esac
    done

    # FAN events with the following conditions will be inserted# into the critical trouble ticket system:
    # NOTIFY_EVENTTYPE => SERVICE | DATABASE | NODE
    # NOTIFY_STATUS => down | public_nw_down | nodedown
    #
    if (( [ "$NOTIFY_EVENTTYPE" = "SERVICE" ] ||[ "$NOTIFY_EVENTTYPE" = "DATABASE" ] || \
        [ "$NOTIFY_EVENTTYPE" = "NODE" ] \
        ) && \
        ( [ "$NOTIFY_STATUS" = "down" ] || \
        [ "$NOTIFY_STATUS" = "public_nw_down" ] || \
        [ "$NOTIFY_STATUS" = "nodedown " ] ) \
        ) ; then
        # << CALL TROUBLE TICKET LOGGING PROGRAM AND PASS RELEVANT NOTIFY_* ARGUMENTS >>
        echo "Create a service request as " ${NOTIFY_EVENTTYPE} " " ${NOTIFY_STATUS} " occured at " ${NOTIFY_LOGTIME} >> ${FAN_LOGFILE}
    else
        echo "Found no interesting event: " ${NOTIFY_EVENTTYPE} " " ${NOTIFY_STATUS} >> ${FAN_LOGFILE}
fi- Cause the generation of a DATABASE DOWN event with srvctl
/u01/app/oracle/product/19.0.0.0/dbhome_1/bin/srvctl stop database -d aTFdbVm_replacename- Examine the entry created in the log file generated in /tmp on node1:
cat /tmp/<hostname>*.log- Examine the entry created in the log file generated in /tmp on node2:
cat /tmp/<hostname>*.log- Cause a DATABASE UP event to be generated:
/u01/app/oracle/product/19.0.0.0/dbhome_1/bin/srvctl start database -d aTFdbVm_replacename- Note the different entries generated in each log (on each node). Exit out of the grid user
exitClient-side FAN Events
FAN events are sent to the application mid-tier or client tier using the Oracle Notification Service (ONS). ONS is configured automatically on the cluster when you install Grid Infrastructure. CRS manages the stop and start of the ONS daemon.
ONS is configured automatically by FAN-aware Oracle clients, which include Universal Connection Pool (UCP), ODP.Net, Weblogic Server with Active Gridlink, CMAN and others, when a particular format connect string is used (for more information on this refer to the Application Continuity checklist: https://www.oracle.com/docs/tech/application-checklist-for-continuous-availability-for-maa.pdf
To determine if a client has received FAN events may require running your client in a debug fashion. This may be difficult to do and even more difficult to interpret.
To confirm that FAN events are being received at a particular tier, you can install a java utility called FANWatcher, that will subscribe to ONS on a cluster and display events that it receives.
Download the FANWatcher utility
- Open a terminal on one of the nodes using CloudShell (Putty or CYGWIN may be used)
- Become the “oracle” user and create a directory named fanWatcher
$ sudo su - oracle
$ mkdir -p /home/oracle/fanWatcher
$ cd /home/oracle/fanWatcher- Download the fanWatcher utility and unzip the file
$ wget https://objectstorage.uk-london-1.oraclecloud.com/p/gKfwKKgzqSfL4A48e6lSKZYqyFdDzvu57md4B1MegMU/n/lrojildid9yx/b/labtest_bucket/o/fanWatcher_19c.zipunzip fanWatcher_19c.zip- Create a database user in the PDB pdb1 and a database service to connect to. The service should have 1 preferred instance and 1 available instance. In this example the service name is testy (choose a name you like), the instance names are as specified, the username is test_user and the password is W3lc0m3#W3lc0m3#
- Create the service and start it.
/u01/app/oracle/product/19.0.0.0/dbhome_1/bin/srvctl add service -d <database_replacename> -s testy -pdb pdb1 -preferred <instance1_replacename> -available <instance2_replacename>
/u01/app/oracle/product/19.0.0.0/dbhome_1/bin/srvctl start service -d <database_replacename> -s testy- Run the hostname command
$ hostname- Connect to sqlplus as SYS. Replace PutYourHostnameHere in the connect string with your hostname
sqlplus sys/W3lc0m3#W3lc0m3#@//<PutYourHostnameHere>/testy.pub.racdblab.oraclevcn.com as sysdba- Run the following commands to create a test user, password W3lc0m3#W3lc0m3# and grant them the appropriate privileges
SQL> CREATE USER test_user IDENTIFIED BY W3lc0m3#W3lc0m3# DEFAULT TABLESPACE users TEMPORARY TABLESPACE temp;
SQL> ALTER USER test_user QUOTA UNLIMITED ON users;
SQL> GRANT connect, resource, create session TO test_user;
SQL> exit;- To get the SCAN address run the following command
$ srvctl config scan- Enter the following commands and edit the fanWatcher.bash script by entering the following vi command
$ ls -al
$ chmod 755 fanWatcher.bash
$ vi fanWatcher.bash- Replace the user, password, and URL. Use the SCAN name in the URL. For example, the fanWatcher.bash script will look like this:
password=<<insert password>
url='jdbc:oracle:thin:@(DESCRIPTION=(ADDRESS_LIST=(ADDRESS=(PROTOCOL=TCP)(HOST=scanname1)(PORT=1521))(ADDRESS=(PROTOCOL=TCP)(HOST=scanname2)(PORT=1521)))(CONNECT_DATA=(SERVICE_NAME=testy.pub.racdblab.oraclevcn.com)))'
user=test_user
export password url user
CLASSPATH="/u01/app/oracle/product/19.0.0.0/dbhome_1/jdbc/lib/ojdbc8.jar:/u01/app/oracle/product/19.0.0.0/dbhome_1/opmn/lib/ons.jar:."
export CLASSPATH

# Compile fanWatcher with the exported classpath
#javac fanWatcher.java

# Run fanWatcher with autoons
${JAVA_HOME}/jre/bin/java fanWatcher autoons
# EOF- Run the fanWatcher.bash script
$ ./fanWatcher.bashWhen fanWatcher is run with the argument autoons it will use the credentials and url provided to connect to the database (wherever it is running) and use that connection to obtain the ONS configuration of the DB system it is connected to. A subscription, to receive FAN events, is created with the Grid Infrastructure ONS daemon.
Connections to the ONS daemon on each node is established forming redundant topology – with no knowledge of the cluster configuration required.
- Act on another node that will generate a FAN event. Kill a SMON background process. For example, on node2 in my system executing the command below will show the SMON process ids for ASM and my database.
$ ps -ef | grep smon- Examine the process id. The process ID in this example is 99992. Your process id will be a different number.
- Kill the process using the command below. Replacing the ##### with the actual numbers of your SMON process.
sudo kill -9 #####- Look at the output from the fanWatcher utility
The fanWatcher utility has received FAN events over ONS. The first event shows reason=FAILURE highlighting the abnormal termination of SMON (by the operating system kill command). event_type=INSTANCE and status=down shows that the instance has crashed.
The event payload contains the same information as displayed in the CALLOUT example you observed, but there are some differences. All Oracle clients are FAN-aware and interpret the FAN events automatically.
You will also see the failed instance get restarted by Grid Infrastructure, and the corresponding UP event is sent. Oracle clients, such as UCP, will react to both UP and DOWN events – closing connections on down and re-establishing them automatically on UP.
** Event Header **
Notification Type: database/event/service
Delivery Time: Wed Feb 7 15:28:58 UTC 2024
Creation Time: Wed Feb 7 15:28:58 UTC 2024
Generating Node: lvracdb-s01-2021-03-10-1203442
Event payload:
VERSION=1.0 event_type=INSTANCE service=ractciiv_iad1tf.pub.racdblab.oraclevcn.com instance=racTCIIV2 database=ractciiv_iad1tf db_domain=pub.racdblab.oraclevcn.com host=lvracdb-s01-2024-02-7-1203442 status=down reason=FAILURE timestamp=2024-02-7 15:28:23 timezone=+00:00

** Event Header **
Notification Type: database/event/service
Delivery Time: Wed Feb 7 15:28:58 UTC 2024
Creation Time: Wed Feb 7 15:28:58 UTC 2024
Generating Node: lvracdb-s01-2021-03-10-1203442
Event payload:
VERSION=1.0 event_type=INSTANCE service=ractciiv_iad1tf.pub.racdblab.oraclevcn.com instance=racTCIIV2 database=ractciiv_iad1tf db_domain=pub.racdblab.oraclevcn.com host=lvracdb-s01-2024-02-7-1203442 status=up reason=FAILURE timestamp=2024-02-7 15:28:58 timezone=+00:00
If fanWatcher can auto-configure with ONS and receive and display events, so can any client on the same tier. This validates the communication path (no firewall blockage for example), and that FAN events are propagating correctly.
That is all for today, hope you enjoyed this tutorial!
Want to Learn More about Application Continuity?
- Application Checklist for Continuous Service for MAA Solutions
- Configuring Continuous Availability for Applications (Level 1, Level 2, and Level 3)
- Ensuring Application Continuity
- Oracle Maximum Availability Architecture
- Application Continuity Protection Check (ACCHK)
- ACCHK Demo
- Fast Application Notification (FAN) – Including fanWatcher
- Application Continuity Main Page